Using on a Linux virtualization system based on KVM and QEMU such as Proxmox VE 8.X with Microsoft operating systems, such as Windows 10, Windows 11, or Windows Server 2022, which during their operation sporadically for no apparent reason, can slow down and even block no longer responding for several minutes due to the Exhaustion of the RAM available for the system, with consequent use of the SWAP file which leads to a degradation of performance.
All this even on machines with minimal resource usage.
Investigating further, the problem appears when running Windows Volume Optimization (Defrag).
By default, in Microsoft Windows installations, a Disk Optimization Task is created in Task Scheduler.
Task Scheduler Library > Microsoft > Windows > Defrag > ScheduledDefrag.

When the scheduled task “ScheduledDefrag” Starts, it can cause a huge use of RAM allocated based on the SIZE of the disk, this can lead to serious slowdowns of the machine and possible saturation of the system memory with possible crashes and all the problems that can result.
The command executed is “%windir%\system32\defrag.exe -c -h -k -g -$“
/c Performs the operation on all volumes.
/h Runs the operation at normal priority (default is low).
/k Performs slab consolidation on the specified volumes.
/g Optimizes the storage tiers on the specified volumes.
https://learn.microsoft.com/en-us/windows-server/administration/windows-commands/defrag
But let’s try to understand why this happens.
Let’s take a Proxmox VE 8.X server as a test environment and configure a new Windows Server 2022 machine respecting the Best Practices.
Below is the link to the official guide.
https://pve.proxmox.com/wiki/Windows_2022_guest_best_practices
The test can be performed on either ZFS or Ceph based storage, SSD or HDD the result is the same.
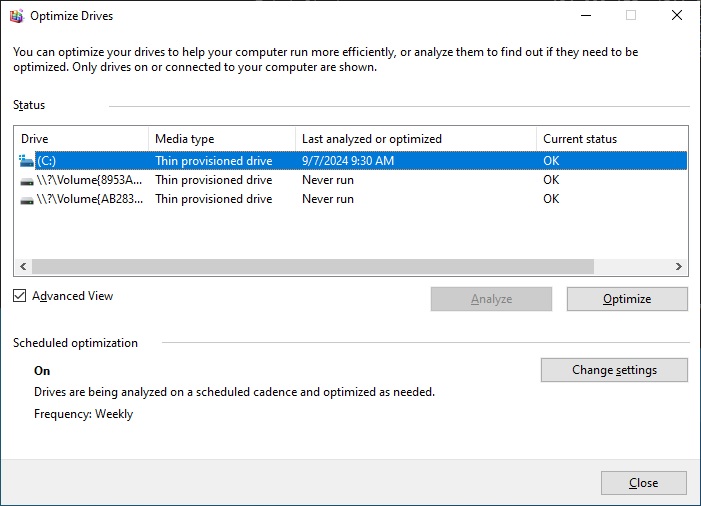
Once the new machine is installed, we launch the optimization program “Defragment and Optimize Drives” and click on “Optimize“.
If we want more details we can open the Command Prompt and launch the Defrag with:
defrag.exe -c -h -k -g -vOr alternatively PowerShell and launch the command:
Optimize-Volume -DriveLetter C -SlabConsolidate -TierOptimize -ReTrim –VerboseIn this case, to perform the test, the following is sufficient:
Optimize-Volume -DriveLetter C -ReTrim –VerboseWe will immediately see that the memory used will increase immediately, the optimization process could last several minutes, making the machine almost unusable.
Looking now at the “Defragment and Optimize Drives” program we immediately notice one thing, the volume is identified as “Thin provisioned drive”.
Regardless of whether you used dynamic disks or not, the volume is identified this way by default.
And this is our problem.
I don’t want to go into the various storage devices but let’s simplify and say that Normally During the Optimization of a “Thin provisioned” disk the operating system executes the “Trim/Unmap” commands.
If it is based on SSD, Trim is used to communicate to the disk which data sectors are no longer in use. This allows the SSD disk to optimize writing and safeguard the life of the disk.
If based on HDD, Unmap is used to notify the storage system which data blocks on the disk have been deleted and are no longer needed. So as to be able to recover the no longer occupied space of the virtual disk in the storage and make it available again for other uses.
More information from Microsoft documentation:
https://learn.microsoft.com/en-us/windows-hardware/drivers/storage/thin-provisioning
The problem occurs when the volume identified as “thin provisioned” is optimized with very small “discard granularity” block sizes to be released.
When creating a virtual disk, the size of the “discard granularity” is set by default to 4k (not to be confused with the size of the disk sectors).
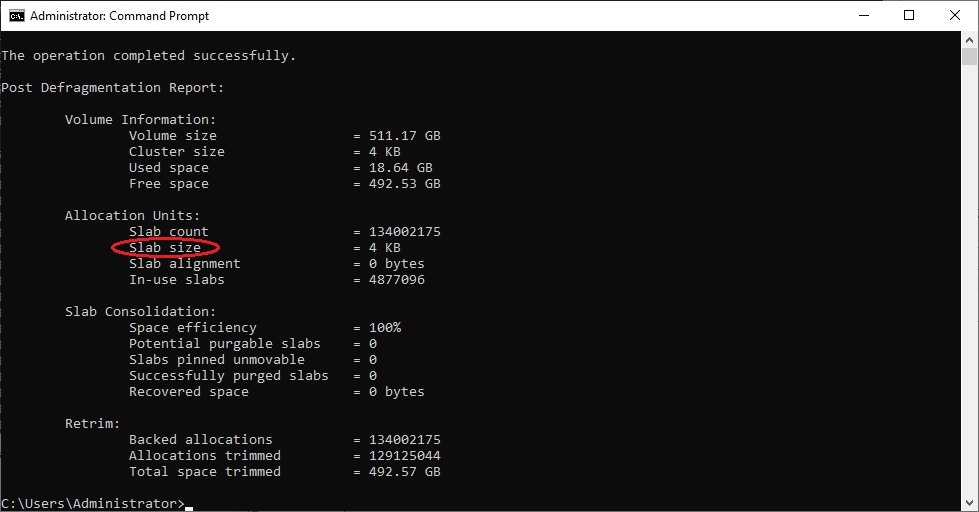
You can verify this value by launching the defrag program from the command prompt in verbose mode:
defrag.exe -c -h -k -g -vOr from PowerShell always in verbose mode:
Optimize-Volume -DriveLetter C -ReTrim –VerboseThe value we are interested in is “Slab size” which is found in the summary in “Allocation Units:”
“Slab size = 4 KB”
In this case it is set to 4096 bytes
What is “discard granularity”?
https://libvirt.org/formatdomain.html#hard-drives-floppy-disks-cdroms
https://www.kernel.org/doc/Documentation/ABI/testing/sysfs-block
discard_granularity
The smallest amount of data that can be discarded in a single operation. It impacts the unmap operations and it must be a multiple of a logical_block_size. This is usually properly configured by the hypervisor.The problem is caused by the Windows optimization program, below are some links to learn more about this problem.
https://support.microsoft.com/en-us/topic/storage-optimizer-memory-use-increases-when-it-runs-on-thin-provisioned-luns-b6f87710-272e-430a-f194-9a74a697133f
https://github.com/virtio-win/kvm-guest-drivers-windows/issues/666
https://bugzilla.redhat.com/show_bug.cgi?id=2020998
https://forum.proxmox.com/threads/windows-vm-requires-lots-of-ram-to-trim-larger-hard-disks.96288/
https://kevinlocke.name/bits/2021/12/10/windows-11-guest-virtio-libvirt/
The solution?
Simple, let’s change the “discard_granularity” value by setting it as that of a Virtual Machine installed on Microsoft Hyper-V.
By installing a virtual machine with Windows Server 2022 on Microsoft Hyper-V and launching the Defrag command from the prompt in verbose mode, the “Slab size” value is 2MB.
How do we change the value of “discard_granularity”?
Using Proxmox VE we have nothing from the GUI to change this option.
The only solution currently available is to manually edit the QEMU configuration file.
Let’s edit the QEMU file of our VM with ID 100, in this case using Proxmox VE the configuration file to edit will have the path “/etc/pve/qemu-server/100.conf“
Inside it there will be the original configuration of the VM:
agent: 1
bios: ovmf
boot: order=scsi0;ide0;ide2;net0
cores: 4
cpu: host
efidisk0: datassd:vm-100-disk-0,efitype=4m,pre-enrolled-keys=1,size=1M
ide0: none,media=cdrom
ide2: none,media=cdrom
machine: pc-q35-9.0
memory: 16384
meta: creation-qemu=9.0.2,ctime=1725699600
name: Win2022
net0: virtio=B7:24:11:7B:46:FE,bridge=vmbr0,firewall=1
numa: 0
ostype: win11
scsi0: datassd:vm-100-disk-1,cache=writeback,iothread=1,size=512G
scsihw: virtio-scsi-single
smbios1: uuid=71e98cfe-b2e7-4c97-9833-3ea948cb909d
sockets: 1
tpmstate0: datassd:vm-100-disk-2,size=4M,version=v2.0
vmgenid: 0670abe6-bcb4-4635-9e6a-0192c299ab03
By inserting additional option “args:” we can specify additional parameters that are not configurable from GUI.
Now we have 2 possibilities.
1 – set the “discard_granularity” for EVERY disk present on our VM.
2 – set the “discard_granularity” on the CONTROLLER, so the set value will be automatically inherited on each disk that is already connected or that will be connected later.
The Windows Server 2022 Virtual Machine is configured using the “VirtIO SCSI single” Controller.
1 – Configuration for each disk
Assuming we want to change ONLY disk connected to “scsi0”, taking the previous configuration file as an example, we can add the following line in the configuration file in the 2nd line.
args: -set device.scsi0.discard_granularity=2097152This will set the “discard_granularity” value to 2097152 Bytes (2MB) for only the “scsi0” disk connected to the controller,
in the case of a second disk “scsi1” this will not be affected by the change.
If we want to specify more disks we can modify the configuration as follows:
args: -set device.scsi0.discard_granularity=2097152 -set device.scsi1.discard_granularity=4MFor the second disk you can specify a different size, even in MB, but please remember that discard_granularity must be a multiple of logical_block_size.
The final configuration file for QEMU with the DISKS modified will look like this:
agent: 1
args: -set device.scsi0.discard_granularity=2097152 -set device.scsi1.discard_granularity=4M
bios: ovmf
boot: order=scsi0;ide0;ide2;net0
cores: 4
cpu: host
efidisk0: datassd:vm-100-disk-0,efitype=4m,pre-enrolled-keys=1,size=1M
ide0: none,media=cdrom
ide2: none,media=cdrom
machine: pc-q35-9.0
memory: 16384
meta: creation-qemu=9.0.2,ctime=1725699600
name: Win2022
net0: virtio=B7:24:11:7B:46:FE,bridge=vmbr0,firewall=1
numa: 0
ostype: win11
scsi0: datassd:vm-100-disk-1,cache=writeback,iothread=1,size=512G
scsi1: datassd:vm-100-disk-3,cache=writeback,iothread=1,size=32G
scsihw: virtio-scsi-single
smbios1: uuid=71e98cfe-b2e7-4c97-9833-3ea948cb909d
sockets: 1
tpmstate0: datassd:vm-100-disk-2,size=4M,version=v2.0
vmgenid: 0670abe6-bcb4-4635-9e6a-0192c299ab03
2 – Configuration for Controller
By changing the Controller property instead, we make sure that each disk that will be connected to it, inherits the correct value of “discard_granularity”. So that when adding each new disk, we should no longer have to manually change the configuration.
Assuming that the controller is always the “VirtIO SCSI single” we will insert:
args: -global scsi-hd.discard_granularity=2097152This way we minimize the changes, and we wouldn’t have to remember to set it later in case there are changes to the disks.
The final configuration file for QEMU with the CONTROLLER modification will look like this:
agent: 1
args: -global scsi-hd.discard_granularity=2097152
bios: ovmf
boot: order=scsi0;ide0;ide2;net0
cores: 4
cpu: host
efidisk0: datassd:vm-100-disk-0,efitype=4m,pre-enrolled-keys=1,size=1M
ide0: none,media=cdrom
ide2: none,media=cdrom
machine: pc-q35-9.0
memory: 16384
meta: creation-qemu=9.0.2,ctime=1725699600
name: Win2022
net0: virtio=B7:24:11:7B:46:FE,bridge=vmbr0,firewall=1
numa: 0
ostype: win11
scsi0: datassd:vm-100-disk-1,cache=writeback,iothread=1,size=512G
scsihw: virtio-scsi-single
smbios1: uuid=71e98cfe-b2e7-4c97-9833-3ea948cb909d
sockets: 1
tpmstate0: datassd:vm-100-disk-2,size=4M,version=v2.0
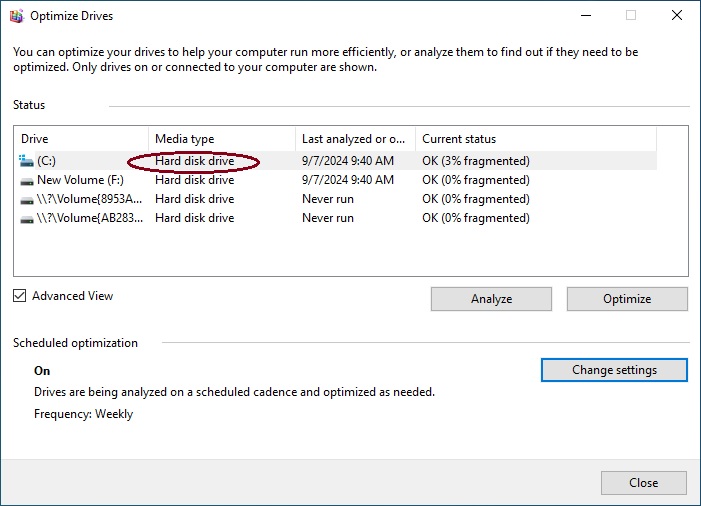
vmgenid: 0670abe6-bcb4-4635-9e6a-0192c299ab03Last useful information, in case you want to disable the identification of the “Media Type” disk on Windows as “Thin provisioned drive” but identify it as a NORMAL disk, therefore as “Hard disk drive” for various needs, you need to set the “discard granularity” value to “0“.
args: -global scsi-hd.discard_granularity=0This way it will be viewed as a normal hard drive.
I hope I was clear enough.
If you need help or want to give suggestions, feel free to contact me on My Linkedin profile https://www.linkedin.com/in/valerio-puglia-332873125/